In case anyone is really interested in setting up their own "table of contents" widget, let me set up the instructions on how exactly I did it.
First I introduced the "spoiler widget" code. What this "spoiler widget" means is when you click on the "Mathematics (Click Me!)" or "Programming (Click Me!)" entries of the table of contents, it expands into a more elaborate table of contents indexing the blog entries. The following is such a widget:
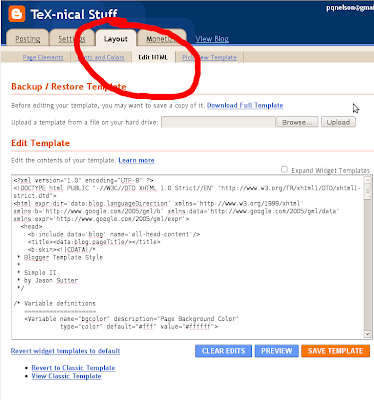
We need to modify the html code, so go to the "Layout" tab, and click on the "edit HTML" tab. See the following screen shot for details:
Find the line of code ]]></b:skin>, which is where the css code ends. We need to add the following lines right before it and after it:
.spoilertop{
background: #E8E8E8;
border: 1px dotted #000;
border-left: 4px solid #8394B2;
color: #000;
margin: 8px auto 0 auto;
padding: 3px;
}

.spoilermain{
background: #E8E8E8;
border: 1px dotted #000;
border-left: 4px solid #8394B2;
border-top: 0;
color: #000;
padding: 4px;
margin: 0 auto 8px auto;
}
]]></b:skin>

<script language='JavaScript' type='text/javascript'>
function openClose(id) {
var obj = "";

if(document.getElementById) obj = document.getElementById(id).style;
else if(document.all) obj = document.all[id];
else if(document.layers) obj = document.layers[id];
else return 1;

if(obj.display == "") obj.display = "none";
else if(obj.display != "none") obj.display = "none";
else obj.display = "block";
}
</script>
This allows you to set up the spoilers. Once you've added this, all you need to do is use the following html code to generate spoilers:
<div class="spoilertop" onclick="openClose('EXWIDGETID')">
  <strong>Example Spoiler (Title)</strong>
</div>
  <div id="EXWIDGETID" style="display: none;" class="spoilermain">
    This is an example of the text contained in the widget.
    Blah blah blah. Huzzah, it works!
  </div>
The EXWIDGETID is the ID of the spoiler, it must be unique (i.e. you can't use the same ID twice). The <strong>Example Spoiler (Title)</strong> is the title of the spoiler, and the text This is an example of the text contained in the widget. Blah blah blah. Huzzah, it works! is the text that will be "spoiled".
To set up a table of contents, one can do the following:
Which is precisely just the following code:
<div class="spoilertop" onclick="openClose('EXINDX')">
  <span style="font-weight: bold;">Example Table of Contents</span>
</div>
<div id="EXINDX" style="display: none;" class="spoilermain">
  <ol>
    <li>
      <div class="spoilertop" onclick="openClose('EXINDX2')">
        <span style="font-weight: bold;">
          Example Of Nested table of Contents
        </span>
      </div>
      <div id="EXINDX2" style="display: none;" class="spoilermain">
        <ol>
          <li>Subentry One</li>
          <li>Subentry Two</li>
        </ol>
      </div>
    </li>
    <li>Entry One</li>
    <li>Entry Two</li>
    <li>Entry Three</li>
    <li>Entry Four</li>
  </ol>
</div>
One can make the entries links followed by a brief explanation if one so desires, or another spoiler "sub-index", like I do with my table of contents. You can see the example code has its "subindex" example code.
No comments:
Post a Comment